Showing posts with label TIPS N TRICKS. Show all posts

Sunday, June 28, 2015

A Complete Guide to how to create Paypal Account

Many users were facing issue with creating a Paypal account and verify it in India. Generally Paypal doesn’t allow Indian users to send payments from one Paypal account to another Paypal account within India. But Paypal is used to receive and send payments to the countries other than India. To receive payment you must link your bank account and to send payments you generally need a credit card linked account. One more limitation is that Indian accounts are auto withdrawn once the payment is received. Also you cannot send payment from the existing funds in your account, you must have linked credit card. The below is the step by step process to create and verify Paypal account in India.


Step by Step Procedure to Creating Paypal Account:

Step 1: Open the official site of PayPal or you can go directly with the Signup link here. 


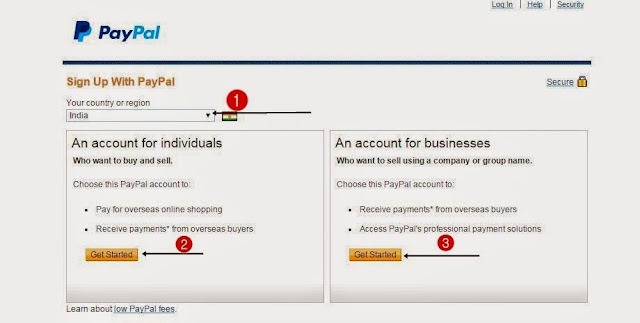
Step 2: After signup, there are three things to be decided in this step.
For reference go through with the image as follows.

    Select your Country i.e India.
    If you are using PayPal as Individual purpose, then get started with Individuals account.
    If you are using PayPal for any business purpose, then get started with Business account.


Step 3: For Individual and Business account, process will be the same but submission of documents will be different to each account. I have selected Individual account. So, let’s get started with individual account.
As soon as your click on Get Started, it shows a page where you need to enter all your details. Note that all the details should be genuine and must be as per your PAN card.


 If you have CC (Credit Card) then you can linkup your CC for your PayPal account for making online payments. If you don’t have Unmark it and click on Agree and Create Account. SBI Debit Card not accepted by Paypal.

Note: If you don't want to link up your Credit card/ Debit card. Just skip to continue.


Step 4: There appears a Captcha verification. So, fill it correctly and then click on Continue.

 Step 5:  Again it asks about Credit or Debit card details to get started with making purchases. So, here if you have credit card then link up credit card, if you don’t have then go with Debit card details.

Note: If you don't want to link up your Credit card/ Debit card. Just skip to continue. 

 Step 6: Your PayPal account is created successfully. In Gmail account, PayPal mention some tasks to be completed for the full verification of PayPal account. For clear reference see the Image as follows.

 Step 8: Login to your PayPal account. Then there appears a security question task. Complete it and click on submit.

 Step 9: Once you done with the security task, you need to complete the tasks to receive the payment.
 See the image as follows.

 Step 10:  The Tasks list will appear as shown in the below image. Now complete all the tasks one by one with the necessary credentials.

 Task 1. Submit PAN card information correctly and then click on submit. PayPal will check and verify your PAN card as shown in below image.

 Task 2. PayPal will send confirmation mail to your Gmail ID. Check your Gmail ID for and then confirm your PayPal account.

 Task 3. By adding a bank account you can receive funds and withdraw it. Once you add a Bank account, PayPal will send two small deposits to the bank account within 3-5 business days. Please log in to your PayPal account, and enter the two amounts to lift your sending and withdrawal limit.


 Task 4. Your Purpose Code indicates the nature of business for which you receive payments into your PayPal Account. Please make sure you select the Purpose Code that accurately describes your business transactions. This is required as per Indian regulations.

That’s it you are done. Once you completed all the tasks given in the PayPal then you are done with your PayPal ID. Now, you can transfer and receive payments.
Note:  you can choose any purpose code you preferred Eg: Sofware consultant/ Advertising/ Marketing etc.,


So, that’s all your Paypal account is ready to receive payments. To send payments you just have to link your credit card. Paypal doesn’t allow debit cards to send payments but using some banks debit cards you can send payments. Let us know if you have any doubts in your comments.

SRC:: alltechbuzz.net


Generally Paypal doesn’t allow Indian users to send payments from one paypal account to another paypal account within India. But paypal is used to receive and send payments to the countries other than India. To receive payment you must link your bank account and to send payments you generally need a credit card linked account. One more limitation is that Indian accounts are auto withdrawn once the payment is received. Also you cannot send payment from the existing funds in your account, you must have linked credit card. The below is the step by step process to create and verify paypal account in India. - See more at: http://www.alltechbuzz.net/create-verify-paypal-account-india/#sthash.lPdQfPqA.dpuf

Monday, September 23, 2013

Forgot your Windows admin password?

  • This is a utility to reset the password of any user that has a valid local account on your Windows system.
  • Supports all Windows from NT3.5 to Win7, also 64 bit and also the Server versions (like 2003 and 2008)
  • You do not need to know the old password to set a new one.
  • It works offline, that is, you have to shutdown your computer and boot off a CD or USB disk to do the password reset.
  • Will detect and offer to unlock locked or disabled out user accounts!
  • There is also a registry editor and other registry utilities that works under linux/unix, and can be used for other things than password editing. 

How to use?

Please read the walthrough and the FAQ before mailing me questions If you have the CD or USB, all drivers are included.
If you use the floppy, you need one or more of the driver floppies, too.

Overview

  1. Get the machine to boot from the CD or USB drive.
  2. Floppy version need to swap floppy to load drivers.
  3. Load drivers (usually automatic, but possible to run manual select)
  4. Disk select, tell which disk contains the Windows system. Optionally you will have to load drivers.
  5. PATH select, where on the disk is the system?
  6. File select, which parts of registry to load, based on what you want to do.
  7. Password reset or other registry edit.
  8. Write back to disk (you will be asked) 

Download 

Note: Some links may be offsite.

CD release, see below on how to use
  • cd110511.zip (~3MB) - Bootable CD image. (md5sum: fe0d30a1c540ec6757e748c7c09e2e4f) use this
  • usb110511.zip (~3MB) - Files for USB install (md5sum: 50ced8d2a5febe22199f99acec74e63b)
  • cd100627.zip (~4MB) - Previous version CD. (md5sum: 6d80cdfbba97457e413f95a3554d9524) The files inside the USB zip are exactly the same as on the CD. See below for instructions on how to make USB disk bootable.
Source : pogostick.net/~pnh/ntpasswd/

Friday, November 23, 2012

How to Install and Run Windows XP on a USB Flash or Pendrive

4 Ways to Create Bootable Live USB Drives (For Windows, Linux and Mac OS X)


1. Using UNetbootin (for Windows and Linux)


photobucketUNetbootin allows you to create bootable Live USB drives for a variety of Linux distributions from Windows or Linux, without requiring you to burn a CD. You can either let it download one of the many distributions supported out-of-the-box for you, or supply your own Linux .iso file if you've already downloaded one or your preferred distribution isn't on the list.

UNetbootin has built-in support for automatically downloading and loading the following distributions: Ubuntu, Debian, Fedora, PCLinuxOS, Linux Mint, Sabayon Linux, Gentoo, MEPIS, openSUSE, Zenwalk, Slax, Dreamlinux, Arch Linux, Elive, CentOS, Damn Small Linux, Mandriva, SliTaz, FaunOS, Puppy Linux, FreeBSD, gNewSense, Frugalware Linux, NetBSD but can work with others too.


UNetbootin can also be used to load various system utilities, including:
  • Parted Magic, a partition manager that can resize, repair, backup, and restore partitions.
  • Super Grub Disk, a boot utility that can restore and repair overwritten and misconfigured GRUB installs or directly boot various operating systems
  • Backtrack, a utility used for network analysis and penetration testing.
  • Ophcrack, a utility which can recover Windows passwords.
  • NTPasswd, a utility which can reset Windows passwords and edit the registry.
  • Gujin, a graphical bootloader that can also be used to boot various operating systems and media.
  • Smart Boot Manager (SBM), which can boot off CD-ROM and floppy drives on computers with a faulty BIOS.
  • FreeDOS, which can run BIOS flash and other legacy DOS utilities.

Installation & Screenshots

  1. If using Windows, run the file, select a distribution, floppy/hard disk image, or kernel/initrd to load, select a target drive (USB Drive or Hard Disk), then reboot once done.
  2. If using Linux, make the file executable (using either the command chmod +x ./unetbootin-linux, or going to Properties->Permissions and checking "Execute"), then start the application, you will be prompted for your password to grant the application administrative rights, then the main dialog will appear, where you select a distribution and install target (USB Drive or Hard Disk), then reboot when prompted.

    screenshot

    screenshot
  3. After rebooting, if you created a Live USB drive by selecting "USB Drive" as your install target, press the appropriate button (usually F1, F2, F12, ESC, or backspace) while your computer is starting up to get to your BIOS boot menu and select USB drive as the startup target; otherwise if there's no boot selection option, go to the BIOS setup menu and change the startup order to boot USB by default. Otherwise, if you did a "frugal install" by selecting "Hard Disk" as your install target, select the UNetbootin entry from the Windows Boot Menu as the system boots up.


To create a Live USB using UNetbootin, download an ISO file, select it under UNetbootin's "diskimage" option, and specify your target USB disk under "Drive:". After pressing OK, wait as the ISO is extracted to your USB drive; once done, you will have a bootable Linux Mint Live USB drive.

Requirements

1 GB or larger USB drive, formatted as Fat32 (most USB drives come formatted as FAT32 by default, but if you need to format it, on Windows, go to My Computer->right click your USB drive->format, or on Linux, use GParted or another partition manager)

Supported operating systems: Windows 2000 and above OR a modern Linux distribution

Additional dependencies (Linux Only): You will need the packages syslinux and p7zip-fullinstalled (no dependencies on Windows)

2. Using Win32 Image Writer (Windows only)


Graphical Interface


win32imagewriter.jpg
  1. Download the desired .img file
  2. Insert your flash media
  3. Note the drive letter assigned to your flash media
  4. Start Disk Imager
  5. Select the downloaded file and target device, and click "Write"
  6. Remove your flash media when the operation is complete

Command Line alternative


  1. Download the desired .img file
  2. Download flashnul from http://shounen.ru/soft/flashnul
  3. Attach your USB drive
  4. Run flashnul -p
  5. Note the physical device number for the USB drive
  6. Run flashnul -L \path\to\downloaded.img
  7. Answer "yes" if the selected destination device is correct
  8. Remove your USB drive when the command completes

3. Using usb-imagewriter (Ubuntu Only)


Graphical Interface


usb-imagewriter.png
  1. Download the desired .img file
  2. Install the usb-imagewriter package
    • If your release does not include this, download it from Oliver's PPA
  3. Open Applications -> Accessories -> Image Writer
  4. Insert your flash media
  5. Select the downloaded file and flash device, and click "Write to Device"
  6. Remove your device when the operation is complete

Command Line alternative


  1. Download the desired .img file
  2. Open a terminal and insert your flash media
  3. Look at the output of dmesg | tail -20 to determine the device node assigned to your flash media (e.g. /dev/sdb)
  4. Run sudo umount /dev/device/node
  5. Run sudo dd if=/path/to/downloaded.img of=/dev/device/node bs=1M
  6. Remove your flash media when the command completes

Update: Ubuntu now includes "Startup disk creator". You can access it via System > Administration > Startup Disk Creator and it's a very easy to use tool. Simply enter your memory stick into the USB drive, then open Startup Disk Creator and select "Format" (the USB stick needs to be formatted first), then select the ISO image you want to write on the USB memory stick and click "Make startup disk". That's it.


4. Using Diskutil (Mac OS X only)


  1. Download the desired .img file
  2. Open a Terminal (under Utilities)
  3. Run diskutil list to get the current list of devices
  4. Insert your flash media
  5. Run diskutil list again and determine the device node assigned to your flash media (e.g. /dev/disk2)
  6. Run diskutil unmountDisk /dev/diskN
  7. Execute sudo dd if=/path/to/downloaded.img of=/dev/diskN bs=1m
  8. Run diskutil eject /dev/diskN and remove your flash media when the command completes.
    Src: webupd8.org

Thursday, May 31, 2012

Administrator and User Passwords in Windows XP

Direct Bootup Without Typing Password

1. At a command prompt, type "control userpasswords2" and press Enter to open the Windows 2000-style User Accounts  application.

2. On the Users tab, clear the Users Must Enter A User Name And Password To Use This Computer check box and then click OK.


3. In the Automatically Log On dialog box that appears, type the user name and password for the account you  want to be logged on each time you start your computer.


Remove Login Password

 Control Panel/Administrative Tools/Local Security Settings/Minimum Password Length/Reduce it to 0 (No password required). Control Panel/User Account/Your Account/Remove Password.  

Cannot Change the Administrator Password in Control Panel

After you log on as an administrator to a computer that is not a member of a domain, when you double-click User Accounts in Control Panel to change the password for the built-in Administrator account, the Administrator account may not appear in the list of user accounts. Consequently, you cannot change its password.

This behavior can occur because the Administrator account logon option appears only in Safe mode if more than one account is created on the system. The Administrator account is available in Normal mode only if there are no other accounts on the system.  To work around this behavior:

- If you are running Windows XP Home Edition, restart the computer and then use a power user account to log on to the computer in Safe mode.

- If you are running Windows XP Professional, reset the password in the Local Users and Groups snap-in in Microsoft  Management Console (MMC):

1. Click Start, and then click Run.
2. In the Open box, type "mmc" (without the quotation marks), and then click OK to start MMC.
3. Start the Local Users and Groups snap-in.
4. Under Console Root, expand "Local Users and Groups", and then click Users.
5. In the right pane, right-click Administrator, and then click Set Password.
6. Click Proceed in the message box that appears.
7. Type and confirm the new password in the appropriate boxes, and then click OK.

 How to Change User Password at Command Prompt

How to use the net user command to change the user password at a Windows command prompt. Only administrators can change domain passwords at the Windows command prompt.  To change a user's password at the command prompt, log on as an administrator and type:  "net user <user_name> * /domain" (without the quotation marks)

When you are prompted to type a password for the user, type the new password, not the existing password. After you type the new password, the system prompts you to retype the password to confirm. The password is now changed.

Alternatively, you can type the following command:  net user <user_name> <new_password>.  When you do so, the password changes without prompting you again. This command also enables you to change passwords in a batch file.

Non-administrators receive a "System error 5 has occurred. Access is denied" error message when they attempt to change the password.

How to Enable Automatic Logon in Windows 

If you set a computer for auto logon, anyone who can physically obtain access to the computer can gain access to all of the computer contents, including any network or networks it is connected to. In addition, if you enable autologon, the password is stored in the registry in plaintext. The specific registry key that stores this value is remotely readable by the Authenticated Users group.
As a result, this setting is only appropriate for cases where the computer is physically secured, and steps have been taken to ensure that untrusted users cannot remotely access the registry.
1. Start/Run/Regedit, and then locate the following registry subkey:
    HKEY_LOCAL_MACHINE\SOFTWARE\Microsoft\WindowsNT\CurrentVersion\Winlogon
2. Using your account name and password, double-click the DefaultUserName entry, type your user name, and then click
    OK.
3. Double-click the DefaultPassword entry, type your password, and then click OK.

NOTE: The DefaultPassword value may not exist. If it does not:

a. Click Add Value on the Edit menu.
b. In the Value Name box, type DefaultPassword, and then click REG_SZ for the Data Type
c. Type your password in the String box, and then save your changes.

Also, if no DefaultPassword string is specified, Windows automatically changes the value of the AutoAdminLogon key
from 1 (true) to 0 (false), thus disabling the AutoAdminLogon feature.

4. Click Add Value on the Edit menu, enter AutoAdminLogon in the Value Name box, and then click REG_SZ for the Data
    Type.
5. Type "1" (without the quotation marks) in the String box, and then save your changes.
6. Quit Regedit.
7. Click Start, click Shutdown, and then click OK to turn off your computer.
8. Restart your computer and Windows. You are now able to log on automatically.

NOTE: To bypass the AutoAdminLogon process, and to log on as a different user, hold down the SHIFT key after you log off or after Windows restarts.

Note that this procedure only applies to the first logon. To enforce this setting for subsequent logoffs, the administrator must set the following registry key:

HKEY_LOCAL_MACHINE\SOFTWARE\Microsoft\WindowsNT\CurrentVersion\Winlogon

Value: ForceAutoLogon
Type: REG_SZ
Data: 1

Saturday, November 26, 2011

TOP 107 SHORTCUT COMMANDS 

Type in command or run command:


1. Accessibility Controls - access.cpl
2. Accessibility Wizard - accwiz
3. Add Hardware Wizard - hdwwiz.cpl
4. Add/Remove Programs - appwiz.cpl
5. Administrative Tools - control admintools
6. Automatic Updates - wuaucpl.cpl
7. Bluetooth Transfer Wizard - fsquirt
8. Calculator - calc
9. Certificate Manager - certmgr.msc
10. Character Map - charmap
11. Check Disk Utility - chkdsk
12. Clipboard Viewer - clipbrd
13. Command Prompt - cmd
14. Component Services - dcomcnfg
15. Computer Management - compmgmt.msc
16. Control Panel - control
17. Date and Time Properties - timedate.cpl
18. DDE Shares - ddeshare
19. Device Manager - devmgmt.msc
20. Direct X Troubleshooter - dxdiag
21. Disk Cleanup Utility - cleanmgr
22. Disk Defragment - dfrg.msc
23. Disk Management - diskmgmt.msc
24. Disk Partition Manager - diskpart
25. Display Properties - control desktop
26. Display Properties - desk.cpl
27. Dr. Watson System Troubleshooting Utility - drwtsn32
28. Driver Verifier Utility - verifier
29. Event Viewer - eventvwr.msc
30. Files and Settings Transfer Tool - migwiz
31. File Signature Verification Tool - sigverif
32. Findfast - findfast.cpl
33. Firefox - firefox
34. Folders Properties - control folders
35. Fonts - control fonts
36. Fonts Folder - fonts
37. Free Cell Card Game - freecell
38. Game Controllers - joy.cpl
39. Group Policy Editor (for xp professional) - gpedit.msc
40. Hearts Card Game - mshearts
41. Help and Support - helpctr
42. HyperTerminal - hypertrm
43. Iexpress Wizard - iexpress
44. Indexing Service - ciadv.msc
45. Internet Connection Wizard - icwconn1
46. Internet Explorer - iexplore
47. Internet Properties - inetcpl.cpl
48. Keyboard Properties - control keyboard
49. Local Security Settings - secpol.msc
50. Local Users and Groups - lusrmgr.msc
51. Logs You Out Of Windows - logoff
52. Malicious Software Removal Tool - mrt
53. Microsoft Chat - winchat
54. Microsoft Movie Maker - moviemk
55. Microsoft Paint - mspaint
56. Microsoft Syncronization Tool - mobsync
57. Minesweeper Game - winmine
58. Mouse Properties - control mouse
59. Mouse Properties - main.cpl
60. Netmeeting - conf
61. Network Connections - control netconnections
62. Network Connections - ncpa.cpl
63. Network Setup Wizard - netsetup.cpl
64. Notepad - notepad
65. Object Packager - packager
66. ODBC Data Source Administrator - odbccp32.cpl
67. On Screen Keyboard - osk
68. Outlook Express - msimn
69. Paint - pbrush
70. Password Properties - password.cpl
71. Performance Monitor - perfmon.msc
72. Performance Monitor - perfmon
73. Phone and Modem Options - telephon.cpl
74. Phone Dialer - dialer
75. Pinball Game - pinball
76. Power Configuration - powercfg.cpl
77. Printers and Faxes - control printers
78. Printers Folder - printers
79. Regional Settings - intl.cpl
80. Registry Editor - regedit
81. Registry Editor - regedit32
82. Remote Access Phonebook - rasphone
83. Remote Desktop - mstsc
84. Removable Storage - ntmsmgr.msc
85. Removable Storage Operator Requests - ntmsoprq.msc
86. Resultant Set of Policy (for xp professional) - rsop.msc
87. Scanners and Cameras - sticpl.cpl
88. Scheduled Tasks - control schedtasks
89. Security Center - wscui.cpl
90. Services - services.msc
91. Shared Folders - fsmgmt.msc
92. Shuts Down Windows - shutdown
93. Sounds and Audio - mmsys.cpl
94. Spider Solitare Card Game - spider
95. SQL Client Configuration - cliconfg
96. System Configuration Editor - sysedit
97. System Configuration Utility - msconfig
98. System Information - msinfo32
99. System Properties - sysdm.cpl
100. Task Manager - taskmgr
101. TCP Tester - tcptest
102. Telnet Client - telnet
103. User Account Management - nusrmgr.cpl
104. Utility Manager - utilman
105. Windows Address Book - wab
106. Windows Address Book Import Utility - wabmig
107. Windows Explorer - explorer

Tuesday, February 15, 2011

Install Windows xp in less than 15 minutes

1. Boot through Windows XP CD.
2. After all the files are completely loaded, you get the option to select the partition. Select “C”.
3. Now Format the partition, whether it is normal or quick with NTFS or FAT
4. Once the formatting is completed, All the setup files required for installation are copied. Restart your system by pressing Enter.
Now, here begins the Simple trick to save 10-15 minutes.
5. After rebooting, you get a screen where it takes 40 minutes to complete or finalize the OS installation.
6. Now, Press SHIFT + F10 Key ->  This opens command prompt.
7. Enter “Taskmgr” at the command prompt window. This will open Task Manager.
8. Click the Process Tab, here we find a process called Setup.exe -> Right Click on Setup.exe -> Set Priority -> Select High or Above Normal. Initially it will be Normal.
see how fast the installation process completes
Disable Access to USB Mass Storage Drive

Goto start > run > and type in regedit and press enter.
This will open registry editor window. Now go to the
following key:
HKEY_LOCAL_MACHINE\SYSTEM\CurrentControlSet\Services\USBSTOR
Right click on the key and select export and save a backup copy in case
anything goes wrong. Now on the right pan of the regedit window double
click on the value called Start & set it value to 4 & click OK.
When you need to use your USB mass storage drive just change the value of
Start to 3.
If you’re too lazy just copy & paste these codes into a notepad
file and save it with a .reg extension.
code for Disable access to the usb mass storage drive :
REGEDIT4
[HKEY_LOCAL_MACHINE\SYSTEM\CurrentControlSet\Services\USBSTOR]
“Start”=dword:00000004

code for enable access to the usb mass storage drive :
REGEDIT4
[HKEY_LOCAL_MACHINE\SYSTEM\CurrentControlSet\Services\USBSTOR]
“Start”=dword:00000003

How to Show Your Name Beside Taskbar Clock

This hack will enable you to show your name or any desired text
beside windows taskbar ( system tray ) clock.
Follow these steps :
1. Go to Control Panel > Regional & Language Options.
2. In the Regional Otions tab click on Customize & Go to Time Tab.


3.Select the AM Symbol box & enter your name or any
desired text. ( This Will Show up Intead of AM or after AM )
4. Select PM Symbol box & enter your name or any
desired text. ( This Will Show up Intead of PM or after PM)
5. Click on Apply & OK. Click on Apply & OK.

Refrain Command Prompt from Disappearing

Windows basically execute run commands from within command prompt.
Every time you execute a command from windows run dialogue box
the command prompt just disappears. This method has it’s own
advantage & disadvantage.

But, sometime we need to see the command output in command prompt window. But run dialouge box just don’t allow us to do so.

Say, You have executed a command like chkdsk, ipconfig or systeminfo into run
dialogue box. But after executing this command the command prompt
will just quit without showing you any result.

But if you need to see the output of that command that you give in
run dialogue box you have to refrain command prompt from disappearing.
So, Here is the trick for Refrain Command Prompt from Disappearing :D
Just add cmd /k before you type in any command into run dialogue box.
For eg :
cmd /k ipconfig
cmd /k systeminfo

cmd /k chkdsk 

Wednesday, January 19, 2011

Boot Defragment

                                       A very important new feature in Microsoft Windows XP is the ability to do a boot defragment. This basically means that all boot files are placed next to each other on the disk drive to allow for faster booting. By default this option is enabled but some upgrade users have reported that it isn't on their setup.

    Start Regedit. 

    Navigate to HKEY_LOCAL_MACHINE\SOFTWARE\Microsoft   \Dfrg\BootOptimizeFunction
    Select Enable from the list on the right.
    Right on it and select Modify.
    Change the value to Y to enable and N to disable.
    Reboot your computer.

Wednesday, December 22, 2010


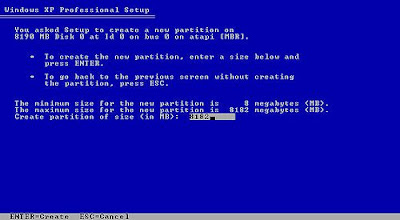
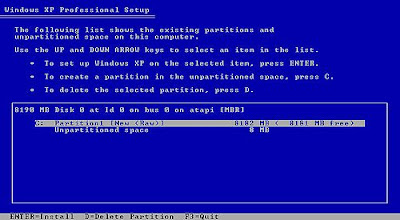
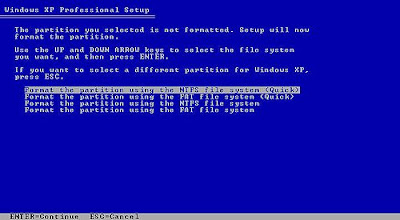
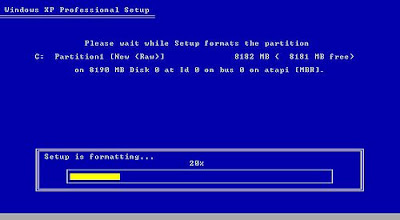
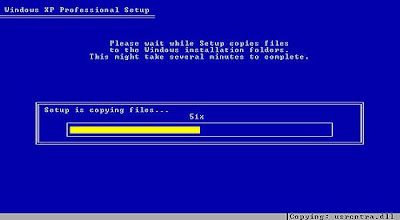
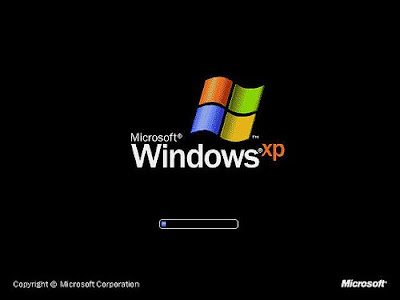
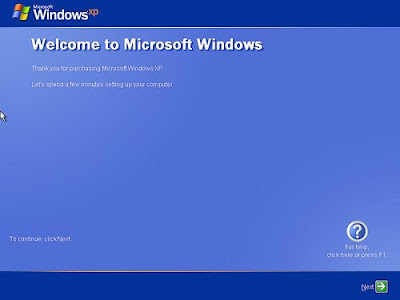
WINDOWS XP INSTALLATION
STEP BY STEP IN IMAGES

  •        Insert Windows XP Bootable cd into your dvd/cd rom.
  •        Change BIOS setting. Press DEL to enter BIOS setup, for Intel press     F2/F10 to change bootable device.
  •        Change First Bootable device to DVD/CD Rom in advanced tab/ Boot     tab.
  •        F10 for save setting and automatically reboots
  •        When rebooted you will prompt PRESS ANY KEY TO BOOT CD...
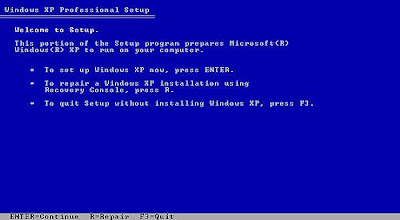
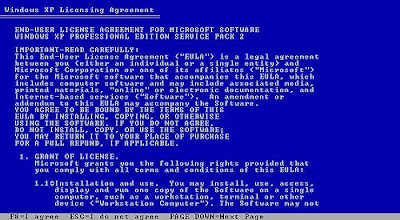
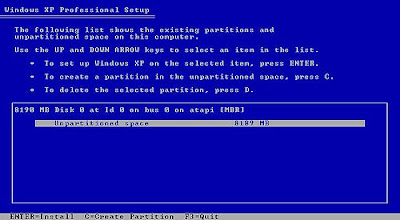
  •        Then the process start as follows.